2n3055 Inverter Circuit Diagram

In this article here, we can learn to convert 10 watt inverter. Sometimes we need less watt inverter for a 5 or 7 watt power light. To get longer support we will have to use small watt inverter. There is no need to switch between 400 or 500 watts for a small light. This inverter is very easy to change. And also small costs. We need a normal transformer. The 12-0-12 voltage is secondary and the initial 220 voltage.

This is a step-down transformer. And 2 resistant 220 ohms and 5 watt. 2n3055 requires two pieces of transistor, in this diagram we can see what we need to do in this electronic signaling circuit. Transformers will have 12-0-12 voltage and 2 amperes. These Transformers we can get from the old computer subwoofer. How to make an inverter home 10 watts.

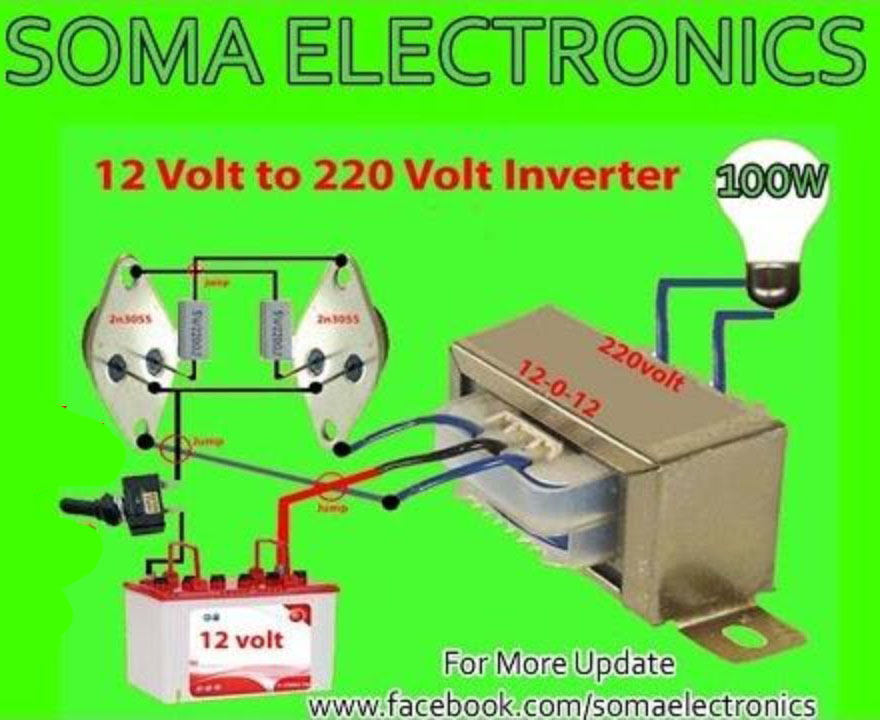
Here we need 12 voltage only. some people tell me to make 24 voltage inverter, here we also can use 24 voltage. but if we use 24 voltage then we need a 24-0-24 voltage transformer.

In this article, we are going to an inverter. It’s so easy to do. We only use transistors, Rezaster and Transformers. We use step-down transformer here. But for the better, we have to use a step-up transformer. We have 12-0-12 secondary and primary use 220. Because of our AC voltage 220. If you need 110 voltages you can use 110 Transformers. Here’s the need for NPN transistor.We have a silicon npn power transistor using 2N3055. We can use any other NPN transistor. We use ceramic resistant. We use 5 watt and 330 ohms. We can use 220 ohms. But for better performance, we need to use a good transformer or else we can not get good output. How to make the inverter?

DIY Portable Video Player Decoder MP5

A. Support USB, TF card, Bluetooth wireless connection, infrared remote control B. Play MP3 & WMA, lossless decompressing play, memory play if no power supply 3. PREVE: previous song / volume down (short press to choose the previous song, long press to turn down the volume) 4. NEXT: next song / volume plus (short press to choose the next song, long press to turn up the volume) 5. Powerful compatible with DVD, SVCD, VCD, DVCD, DVIX, AVI, MKV, FLV and other standard formats Bluetooth MP5 Video Decoder Board HD 1080P Supports Various Lossless Audio Decoding with Bluetooth Function Description: A. Support USB, TF card, Bluetooth wireless connection, infrared remote control B. Play MP3 & WMA, lossless decompressing play, memory play if no power supply C. 5V power supply or 12V power supply D. Radio FM87.8-108 E. LED digital tube display F. AUX sound input G. Key functions:
1. PREVE: previous song / volume down (short press to choose the previous song, long press to turn down the volume) 2. NEXT: next song / volume plus (short press to choose the next song, long press to turn up the volume) 3. PLAY: Short press to play / pause. 4. SETUP: Enter the parameter setting menu H. Powerful compatible with DVD, SVCD, VCD, DVCD, DVIX, AVI, MKV, FLV and other standard formats J. Various dubbing languages (English, Fch, Portuguese, German, Danish, etc.) Multi-angle, multiple subtitles optional K. Video output support: CVBS L. You can configure VFD / LCD / LED to have various display M. Support HD video resolution (1280 * 720) N. Support picture format: JPEG, BMP, CDG

DIY LED Chaser Using Aurduino Project

diagram is here
STEPS: 1. Take 10 resistors of 220 ohm each. 2. Take 10 LEDs of different colors. 3. Connect the cathode end of all LEDs to the GND pin of Arduino. 4. Connect the anode pin of all LEDs with each resistor connected to the end. 5. Now connect the resistors end to pin 2, 3, 4, 5, 6, 7, 8, 9, 10, 11 of the Arduino. 6. Do connections same as circuit diagram. Your LED chaser is ready… You can make your own LED dancing circuit by just improving the code. Cheers! Also subscribe my Youtube channel “SOMA Electronics”
Thanks!
Aurduino Code
int pinsCount=10;                        // declaring the integer variable pinsCount
int pins[] = {2,3,4,5,6,7,8,9,10,11}; // declaring the array pins[]

void setup() {
for (int i=0; i<pinsCount; i=i+1){ // counting the variable i from 0 to 9
pinMode(pins[i], OUTPUT); // initialising the pin at index i of the array of pins as OUTPUT
}
}

void loop() {
for (int i=0; i<pinsCount; i=i+1){ // chasing right
digitalWrite(pins[i], HIGH); // switching the LED at index i on
delay(100); // stopping the program for 100 milliseconds
digitalWrite(pins[i], LOW); // switching the LED at index i off
}
for (int i=pinsCount-1; i>0; i=i-1){ // chasing left (except the outer leds)
digitalWrite(pins[i], HIGH); // switching the LED at index i on
delay(100); // stopping the program for 100 milliseconds
digitalWrite(pins[i], LOW); // switching the LED at index i off
}
}
P8K771

4 Channel Relay Aurduino Home Automation Diagram And Code

Aurduino Code Copy This : int R1 = 9; int R2 = 10; int R3 = 11; int R4 = 12; char data = 0; void setup() { Serial.begin(9600); pinMode(R1, OUTPUT); pinMode(R2, OUTPUT); pinMode(R3, OUTPUT); pinMode(R4, OUTPUT); } void loop() { if (Serial.available()) { data = Serial.read(); Serial.print(data); } if(data == ‘0’){ digitalWrite(R1, 0); } if(data == ‘1’){ digitalWrite(R1, 1); } if(data == ‘2’){ digitalWrite(R2, 0); } if(data == ‘3’){ digitalWrite(R2, 1); } if(data == ‘4’){ digitalWrite(R3, 0); } if(data == ‘5’){ digitalWrite(R3, 1); } if(data == ‘6’){ digitalWrite(R4, 0); } if(data == ‘7’){ digitalWrite(R4, 1); } }
P8K771

Aurduino Home Automation Wireless 4 Channel Bluetooth

Aurduino Code And Diagram : https://goo.gl/FHHXdw
In This Tutorial I Will Show How To Make A Aurduino Home Automation System And This Purpes You Can Use It In Your Home Or Office. For controlling Arduino via Bluetooth, here’s a simple, basic and functional app. The Arduino Bluetooth Relay 4 Channel App supports the control of a 4-channel relay module via Bluetooth (HC-05, HC-06, HC-07 ect.) modules. You can use the Arduino’s pin 13, pin 12, pin 11 and pin 10. You can connect the Bluetooth module on Arduino’s RX pin 0 and TX pin 1. (You can modify the Arduino code and connections.)
P8K771

Portable Mini USB Mp5 Video Player Decoder Module With Infrared Remote Control

in this tutorial i will show how to make a mini usb mp5 video player decoder board
and this video i will show how to connect a USB mp5 player to old crt tv and digital led/lcd tv. This video card have 3 output cable first yellow clour av cable. called video rca cable. But the most common problem of this card is it has no vga output function. It has only av output function.
P8K771

Universal LCD-LED Motherboard Installation Guide Without Firmwere VGA To…

For More Information About LCD/LED TV Motherboard Please Click Here
In this tutorial i will show you how to adjust jumper with panel resulation in monitor motherboard circuit. This video i have show a universal led and lcd monitor motherboard. This motherboard have only VGA cable input connection. VGA connector are connected into this circuit. For panel resolution please search with google search engine. After search panel model no you have find a panel data sheet and download panel datasheet. After download panel datasheet you have to open the datasheet. You will find all information about that panel have you download datasheet. Know about panel datasheet and match LVDS cable with panel datasheet. If you don’t know how many types of LVDS Click Here to know how many types of LVDS cable ?. Now select LVDS Cable And Select panel resolution jumper in monitor VGA Motherboard.

How To Make A Stranger P-518 Amplifier With 2sa5200 & 2sa1943 Transistor

This is the circuit design of 1000W stereo audio amplifier. It is a very good design to assemble, easy to build from your board to the acquisition of components, the output transistors are the .2SC5200 and 2SA1943 relatively cheap and with very good result. In the power supply module we have 6 capacitors 4700uF/80v or more and one 50A bridge rectifier diode, this design can be in versions mono (500 Watts) or stereo (1000 Watts), if it is to mount it in the stereo version it is good to use a transformer of at least 8 Amperes and the voltage in both versions has to be 50v + 50v with central bypass, this transformer can be toroidal or ordinary. Read more at 1000-watt-audio-amplifier-transistors.Click Here

More Information: https://www.somaelectronics.com

For Sponsorship Please Contact : srjewel852@gmail.com

Buy Home Theater Amplifier Setup 5.1.1
Buy Link : https://bit.ly/2ORyfsx

Buy Link : https://bit.ly/2ORyfsx

  • 1080p Up-Conversion with HDMI
  • Clear Sound Digital Amplifier
  • Down Firing Subwoofer
  • Speaker: 1 way 1 speaker, Bass-reflex
  • Down Firing Subwoofer
  • Subwoofer: Woofer- 16cm Cone Type
  • Speaker Front: Full Range- 6.5cm Cone
  • SD Link / ARC (Audio Return Channel)
  • Clear Sound Digital Amplifier
  • Dolby Digital
  • Dolby Pro Logic II
  • Audio: 5.1 ch
  • Dialog Enhancer
  • Features of Panasonic USB Playback Home Theather (SC-XH175):

    • Playable Type: DVD-Video/DivX, DVD-R/DVD-RW, CD-DA, VCD, SCVD, MP3, JPEG
    • Plays All-Region DVDs: Region 1, 2, 3, 4, 5, 6, 0
    • Plays PAL and NTSC Region DVDs on all TVs.
    • 1080p Up-Conversion *1
    • Clear Sound Digital Amplifier
    • Down Firing Subwoofer
    • Wireless Ready for Rear Spekaers
    • VIERA Link / ARC (Audio Return Channel) *2
    • Front Layout Mode
    • Optical Input x 1
    • USB Playback *3

    Specifications of Panasonic USB Playback Home Theather (SC-XH175):

    • Brand: Panasonic
    • Model: SC-XH175
    • Color: Black 
    • Origin: Malaysia
    • Power: 1000 W
    • Weight: 1 Kg

😀 Follow Us Socially 😀
Click Here To Subscribe https://goo.gl/JF7UNY
🌐 Facebook group: https://goo.gl/z9yFFA
🌐 Facebook page: https://goo.gl/mWGXJq
🌐 Twitter : https://goo.gl/PDM97G
🌐 Google+ : https://goo.gl/KgBaV5
🌐 Our Email: somaelectronics852@gmail.com
🌐 Personal Email: srjewel852@gmail.com 
🌐 linkedin Profile: https://goo.gl/E4qMr9 
🔊 LIKE ➡ SHARE ➡ SUBSCRIBE